Monday, September 21, 2009

My dinners have been revolutionized

The other week I finally got around to buying a bamboo vegetable steamer. My real motivation for purchasing one was that I wanted to make vegan sausage (more on that in a later post), but I have been using it for its intended purpose a lot also.


It is so easy to just chop up a bunch of vegetables, toss them in the steamer, and top with seasoning. If I'm in a hurry or just don't want a lot for dinner, I'll just eat vegetables, but you can also cook up some rice or quinoa, and perhaps saute a little tofu to go on top. The steamer is super easy to clean up after, and of course you don't have to use oil like you would for, say, a stir-fry. Recently I scored a huge bag of green beans for 99 cents at the food co-op, and I ate them all in one sitting:


Topping in this instance is a Trader Joe's concoction, Hawaiian Soyaki sauce. Yum!

My one big tip with steaming would be to NOT OVERCOOK your vegetables. Seriously folks. They taste better and retain more nutrients with minimal cooking. I turn off the heat a little bit before things are cooked (for a steamer basket full of green beans, as shown above, that's about four minutes from turning on the burner), then let the steamer sit covered for a moment while I retrieve a dish to put the cooked vegetables in. Remember, if they're underdone, you can always turn the heat back on, but there is no un-cooking overcooked food!

Saturday, September 19, 2009

Swwet tooth Saturday

I've been intrigued by the idea of gluten free baking for a while, but since I don't personally have a gluten intolerance, I've not had serious motivation to actually try it out. However, I recently did some baking with someone who did, so we whipped up a batch of these guys:


Gluten- free chocolate cupcakes with peanut butter frosting. The recipe is from Vegan Cupcakes Take Over the World.

Verdict? These cupcakes are delicious! They were a bit denser than most cupcakes made with wheat flour, but also nice and moist, so the dense crumb was definitely not a problem. Aesthetically, they did seem to sink in the middle--you can absolutely hide the sinkholes with a little frosting, and it certainly doesn't seem to be reflective of bad texture.

If you have a gluten-intolerant baked goods lover in your life, definitely give these guys a whirl! You do have to buy several different kinds of flour, but then you'll be all set to experiment with different varieties of gluten-free deliciousness.


Wednesday, September 16, 2009

waffling: non-political variety

I don't know about you, but I love waffles. When I was little, waffles were a pretty big deal in our house. We usually did a big breakfast on Saturday mornings, and while most weeks that meant pancakes, periodically my parents would break out an enormous mixing bowl and the waffle iron. We did not use mixes. No way! My father was the proud owner of a genuine Belgian waffle recipe, given to him by a Real Live Belgian. Waffles with this recipe required some advance planning, because the primary raising agent was yeast and it needed a while to work. But the results were worth it--using yeast instead of baking powder/soda gives a totally different texture and flavor.

Unfortunately this amazing recipe was....you guessed it, not vegan. I snagged a copy from my dad and thought about veganizing it but never quite got around to figuring out how to get the effect of whipped egg whites without actually whipping any egg whites.

Then I picked up Vegan Brunch, and what was there a recipe for?


Raised waffles! Made with yeast! Naturally I had to try it. I whipped up some batter, let it sit for the recommended hour, and then cranked up the waffle iron. I also made some strawberry rosewater sauce to go along with the waffles:


They make an attractive pairing, no?


Overall, I was pretty happy with the results of this recipe. The results were crisp, delicious waffles that were a perfect vehicle for maple syrup or fruit sauce. My only issue with this recipe is that there is a lot of sugar. There are a couple of reasons I wasn't too psyched about that. First, the waffles had a definite sweet flavor, which I admit I'm not used to. I generally think of waffles as a relatively neutral sweet/savory taste that is then sweetened with toppings. The other issue with the sugar is that it makes the outsides of the waffles brown VERY quickly, and they also had a tendency to stick to my (nonstick) waffle iron. Next time I make these I will probably cut the sugar down to 1 or 2 tablespoons instead of the 1/4 c. the recipe calls for.

Sunday, September 13, 2009

Recipe: Italian style quinoa stuffed peppers

Stuffed peppers are such a fun dinner to make--for some reason people are always more impressed by a grain/vegetable pilaf stuffed into a pepper and baked than they would be by the same pilaf served up as a side in a standard dish. There are endless possibilities for pepper stuffing, and my latest favorite is this one:


The filling is a mixture of quinoa, zucchini, celery, canned tomatoes, onion, and garlic, mixed with some Italian herbs and a healthy dose of white wine. The filling is then stuffed into peppers and baked for a bit to finish things off. Served with a nice salad, one of these peppers is absolutely a meal in itself. I like using quinoa instead of more standard fillings like rice because it has a high protein content, as well as calcium and iron. Plus it's delicious! Be sure to rinse the quinoa to remove bitterness before cooking.

To make four stuffed peppers of your own, you will need:

4 large green peppers, seeds removed

For the stuffing
1 tbsp olive oil
3-4 cloves garlic, crushed
1 small onion, diced
1 tsp oregano
1 tsp thyme
1/2 tsp basil
1 bay leaf
1 zucchini, diced
1 c. quinoa, rinsed
1 14oz. can tomatoes
1/2 c. white wine
1 c. water or vegetable stock

1. In a medium sized saucepan on medium heat (note: you will be cooking the quinoa in this pan as well, so a fry pan will probably NOT cut it), heat the oil. Add onions, saute for 4-5 minutes, until softened. Add garlic and saute for 1-2 minutes more.

2. Add oregano, thyme, basil, bay leaf, and zucchini. Saute for 3-4 minutes.

3. Add quinoa. Stir for 1 minute, all ingredients should be evenly mixed. Add tomatoes, wine, and water or vegetable stock. Cover pot and bring to a boil. Turn heat down and cover mixture, allowing to cook until liquid has been absorbed (~25-30 minutes). When the liquid is almost all absorbed, start the oven preheating to 350F.

4. Spoon filling into peppers, making sure to fill each one completely. Place peppers on a greased baking sheet and pop them in the oven for 30 minutes, or until outsides of peppers are beginning to brown.

5. Remove peppers from oven and allow to cool for a few minutes. Serve whole or sliced in half to show off the stuffing:

Thursday, September 10, 2009

Jackson Pollock Gingerbread

I don't know that I've mentioned it on here before, but I do love a good dessert from time to time. I know people are down on sugar these days and I am definitely a proponent of limiting consumption. However, I also think it's okay to have a little something sweet after dinner a few times a week. Moderation is the key, folks! Also, it's my belief that if you are making most of your food (desert or otherwise) from scratch, you can cut a LOT of hidden sugars from the rest of your day. Have you looked at the labels on some packaged foods these days? Even things that are typically classed as savory frequently have sweeteners added. Get rid of all that stuff and you can most likely eat some dessert with no worries (depending on your personal health conditions and just what you are making to eat during the rest of the day, of course). And the next time you are in a dessert mood, allow me to recommend that you whip up a batch of this lovely stuff:


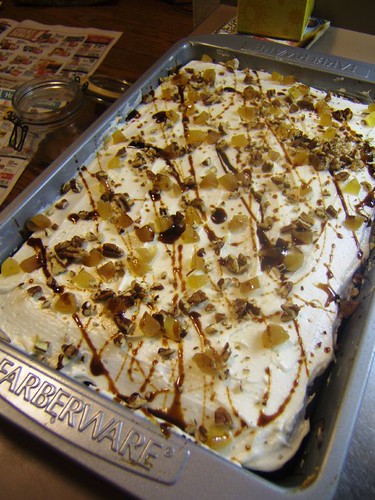
I've termed this number the Jackson Pollock Gingerbread, for the rather abstract decoration scheme that tops it off. The recipe is adapted from one originally posted over at Angry Chicken. There's a sort of secret ingredient: coffee! I know it sounds weird but it really adds a nice deep flavor to the finished product. I've veganized it, made some additions, and top with a lemon icing, crystallized ginger, chopped nuts, and molasses splatters instead of the suggested whipped cream. It is seriously delicious!

To make your own 9x13 pan of gingerbread, you will need:

For the cake
1 c. whole wheat flour
1 1/2 c. all purpose flour
2 tbsp. tapioca flour
1 1/2 tsp. baking soda
1 tbsp ground ginger
2 tsp cinnamon
1 tsp ground cloves
1/2 tsp. salt
1/2 c. canola oil
1 c. molasses
1 tbsp. vinegar
1 c. coffee (the darker, the better)
1/3 c. crystallized ginger, chopped
1/3 c. pecans or walnuts, chopped

For the icing
Note: this icing recipe makes enough to cover the top of the gingerbread. If you want to flip it out of the pan and ice the sides as well, you will need to double it.
1/4 c. margarine or shortening
1 c. powdered sugar
Juice of 1 lemon
2 tbsp. soy milk (or other nondairy milk)

For the topping
1/4 c. crystallized ginger, chopped
1/4 c. pecans or walnuts, chopped
a few tablespoons molasses (you can use as much or as little as you like, but remember that straight molasses has quite a strong taste, so try not to go overboard on the topping)

1. Start oven preheating to 350F and grease a 9x13 baking dish.

2. In a large mixing bowl, combine flours, baking soda, ginger, cinnamon, cloves, and salt.

3. In a separate bowl, combine sugar, oil, molasses, and vinegar.

4. Mix wet and dry ingredients. The batter will be quite stiff at this point--don't worry! The next step will fix that right up.

5. Add coffee to batter.

6. Fold in chopped ginger and nuts.

7. Pour batter into pan and bake for 30 minutes, or until a knife inserted in the center of the cake comes out fairly clean.

8. Allow gingerbread to cool for at least 20 minutes before icing.

9. To prepare the icing, mix together margarine, icing sugar, lemon juice, and soy milk. Spread evenly on top of the gingerbread. Sprinkle nuts and ginger on top of icing. Finally, make the molasses streaking by taking small spoonfuls or knifefuls of molasses and flicking them across the gingerbread (warning, it can get a little messy!). The molasses will flick better if they are warmed briefly in the microwave (no more than 10 seconds) beforehand.

Slice and enjoy with a glass of soymilk or a scoop of vegan ice cream!

Let the brunch odyssey begin!

Last weekend I finally got around to picking up a copy of Isa Chandra Moskowitz's latest offering to the cookbook world, Vegan Brunch. As is the case with her previous works, it did not disappoint. I think I'm going to have a lot more fancy breakfasts in my future. The cooking kicked off with this lovely scrambled tempeh:


The tempeh is sauteed with a few vegetables and a nice big dose of kale. I love tempeh, but somehow I don't seem to eat it that often. My primary protein source most days is just straight beans, and then if I start getting into soy products tofu is kind of my default. I suppose it's that it's more widely available (not that tempeh is all that hard to find--I got this stuff at Trader Joe's). So I was pretty excited to have an excuse to work more tempeh into my repertoire, in the interests of culinary variety.


This dish pretty much typifies why I like Moskowitz's cookbooks so much. They're just full of good food that is fun to make and eat. My experience with vegan cookbooks is that they often fall into two categories: way too simple and repetitive (twenty recipes for lentil loaf!), or incredibly complex recipes that require days of advance planning, special trips to ten different grocery stores, and then five or six hours of preparation to top it all off (vegan haute cuisine). These recipes strike a nice balance in between--the food is fresh and different, but the ingredient lists tend to be fairly straightforward and the preparation is not rocket science either. If you don't have a Moskowitz book on your cooking shelf, you should!

Tuesday, September 1, 2009

Cupboard scrounging: black bean empanadas

Despite my love of cooking and general obsession with food, I sometimes get busy with other stuff and when dinner time rolls around I find I've forgotten to go grocery shopping since what seems like the Carter administration. Since I'm a) lazy, and b) cheap, the end result is usually a dinner thrown together from various non-perishables floating around my kitchen cupboards. Last night was one of those evenings and the end result was these:


Black bean empanadas! These were quick to prepare, filling, and even tasted pretty good! I also had leftovers so lunch today was all taken care off as well. This recipe makes enough dough and filling for eight empanadas. I made it up mostly out of my head so no guarantees on authenticity.

Empanada dough
2c. flour
2 tbsp canola oil
1 tsp baking powder
1/4 tsp salt
1 tbsp. vinegar
2/3 c. cold water


Black bean filling
2 c. cooked black beans
1 c. diced tomatoes (I used three roma tomatoes)
1 small onion, diced
3-4 cloves garlic, crushed
1 jalapeno pepper, seeds removed, finely chopped
1 tsp cumin
1 tsp coriander
1 tbsp oil
salt to taste

1. Prepare the dough. In a mixing bowl, sift together flour, baking powder, and salt. Add the oil to the flour and mix--the flour will become somewhat crumblike. Add vinegar and 1/3 c. water and knead together. Slowly add the remaining water until the mixture becomes a soft (but not sticky!) dough. Roll dough into a ball and leave to sit while you prepare the filling

2. Filling: In a frying pan on a medium heat stove, heat the oil. Add garlic, onion, and jalapeno, and cook for 5 minutes, stirring occasionally. Add cumin, coriander, and tomato and cook for another 10 minutes. Add the black beans and cook for another 5-10 minutes, until everything is nicely heated. Turn off the stove and get going on rolling dough.


3. Divide the dough into eight pieces. On a lightly floured board, roll each piece into a roughly 6" circle.

4. Place approximately 1/2 c. black bean filling on each dough circle, like so:


5. Fold half the dough over the fillings and crimp around the edges with a fork. Repeat until all the empanadas are filled. Place on a baking sheet and get ready to stick those guys in the oven:


6. Bake at 350F for ~25 minutes, until empanadas are lightly browned. Remove from oven, allow to cool for a few moments (unless you are into burning the roof of your mouth off, in which case, okay, cool, whatever floats your boat), then enjoy!

These empanadas were great with a little guacamole, and I bet salsa would pair nicely too: