Showing posts with label roasted red pepper. Show all posts

Monday, August 31, 2009

Recipe: Hummus duo and baba ghanoush with pita crisps

I went to a potluck this weekend, and needed to bring something that could be served cold, since I had a load of errands to run beforehand. Of course, I also wanted it to be somewhat impressive. I decided to go with a selection of dips and pita crisps for dipping:


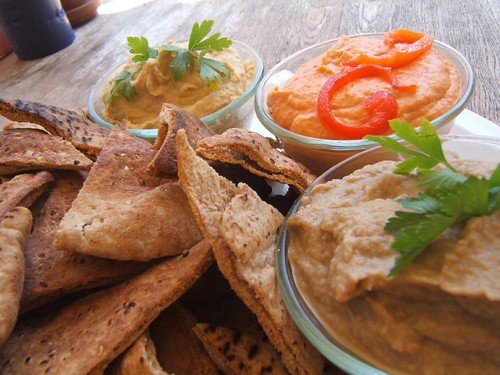
Yum, no? I made baba ghanoush, roasted red pepper hummus, and a classic plain hummus. It sounds like a lot of work to make three dips, but a lot of the prep work for these is combined, so if you're going to commit to one, the trio can be done for not a lot of additional effort. For example, you can roast the eggplant, red pepper, and garlic at the same time, and also have the pita toasts going on your second oven rack. And then you have a great selection of dips to take to parties, break out as snacks, spoon on top of salads, etc. The possibilities are endless!

To make your own, you will need:

1 head garlic
1 large eggplant (1.5-2lbs)
2 red peppers, halved, with seeds removed
2 c. chickpeas
1/4 c. +2 tbsp lemon juice (1/4 c. for hummus, 2 tbsp for baba ghanoush)
1/4 c. tahini (2 tbsp for hummus, 2 tbsp for baba ghanoush)
1 tbsp cumin (2 tsp for the hummuses, 1 tsp for baba ghanoush)
1/4 c. cayenne (optional)
2 tbsp olive oil (1 for hummus, 1 for baba ghanoush), plus ~2tbsp for roasting vegetables
salt to taste
a few sprigs parsley for garnish

NOTE: Both hummus and baba ghanoush can be adjusted a lot to suit your tastes. These are the general proportions that create a hummus that I like, but you may find you prefer something a little different. Treat the recipes more as suggestions than anything set in stone, and feel free to adjust quantities or make additions as you see fit.

If you want to make pita chips, you will also need some pita bread. I used 1 package of 8 pitas for the potluck, but you definitely get enough dip to use up a couple of packages. Slice pitas into eights to make chips


1. Slice eggplant in half and salt. Leave eggplant to sweat for 30 minutes.

2. Brush eggplant and red peppers with olive oil and arrange on a baking sheet. Place garlic on baking sheet as well. Bake in a 450F oven until eggplant is soft and peppers are slightly blackened, ~20 min. If you are making pita chips, you can also arrange them on a baking sheet and toast while you have the oven going.

3. While the vegetables are roasting, you can get started on the plain hummus: in a food processor, combine the chickpeas, 1 tbsp olive oil, 2 tbsp tahini, 2 tsp cumin, and 1/4 c. lemon juice. Blend until smooth, thinning with water as needed (you can also thin with lemon juice or olive oil--be sure to taste test frequently to see how things are shaping up!)

4. Remove vegetables from oven. Leave the eggplant and peppers for a moment. Pull all the cloves off of the garlic and squeeze the garlic out of its skins. Add half of the garlic to the hummus and blend thoroughly. Remove a little more than half of the hummus from the food processor, and your classic garlic hummus is done! The hummus left in the food processor will form the basis of the red pepper hummus.

5. Peel the skins off of the red peppers. Slice a thin piece or two off of the peppers to use as garnish. Coarsely chop the remaining pepper and toss in the food processor with hummus. Blend until smooth. Scrape the hummus out and clean off the food processor for the final dip, baba ghanoush.

6. Baba ghanoush time! Remember that eggplant you roasted? Scrape out the flesh and place it in the food processor (chuck the skins into your compost). Add the rest of the garlic, 2 tbsp lemon juice, 2 tbsp tahini, 1 tsp cumin, 1/4 tsp cayenne and 1 tbsp olive oil. Blend until smooth. Scrape out the baba ghanoush.

7. Arrange your dips in nice bowls and garnish with parsely and red pepper slivers. Serve with pita chips:


Enjoy!

Thursday, August 20, 2009

sinquesadillas

Last weekend I had a potluck to go to, so I wanted to make something delicious and easy to eat. I cracked open my cookbooks and settled on the Grilled Yuca Tortillas recipe from Veganomicon, which is basically a recipe for quesadillas minus the cheese. However, when I went to pick up ingredients, I ran into a slight hitch: my food co-op did not sell yuca. The grocery store down the street did not have yuca (although they did tell me they have it sometimes, but it's a "seasonal" item). The grocery store by the library did not have yuca, and Trader Joes was also a yuca free zone.

I decided four stores was enough searching for one lousy root vegetable and started contemplating substitutes. After some conversation with the manager at my food co-op, I decided to go with a mix of russet baking potatoes and Garnet sweet potatoes. The Garnet potatoes are lighter in color than the usual sweet potatoes you find in the grocery store and are not as sweet. I picked up about 3/4 lb. of the Garnet potatoes, 2 large russet potatoes, and also one very large regular sweet potato (I made two flavors of this recipe, details below).

For the first filling, I used 1 1/2 russet potatoes and all the Garnet potatoes. I boiled all the potatoes and left the skins on since a) I like the taste of potato skins b) they add some nice flecks to the mashed potato and c) hello, that's where all the nutrients are! This version was made according to the main directions in Veganomicon, and I added in 2 roasted red peppers and approximately 1/2 c. of corn salsa that I had from Trader Joe's. This made enough filling for 7 large white flour tortillas.

The second batch of quesadillas used the regular sweet potato and remaining 1/2 russet potato. I also added in approximately 1 c. of cooked black beans, a few teaspoons of cumin and a pinch of salt. This made enough filling for 6 large tortillas. After all the filling was in the tortillas, I had a massive and beautiful stack of no queso quesadillas waiting to be cooked:


Looks delicious, no?

Next, the recipe calls for browning the quesadillas on the stovetop. However, I only own a single frying pan and I didn't have all night to brown quesadillas. Instead, I turned my oven up to 350F, oiled a couple of baking sheets, and placed 3 tortillas at a time on each sheet. I then lightly oiled the tops of the quesadillas and popped them in the oven for 10-15 minutes while I primped for the party. When the tortillas were lightly browned on top, I took them out and cut each quesadilla in half. Everything was then nicely arranged on a platter along with a bowl of tropical salsa (mango, avocado, tomato, lime juice, cilantro, not pictured...sorry! I was running late!).

For comparison purposes, I did also cook a few quesadillas on the stove. Honestly, I thought the ones in the oven were a little better--they had more crunch and did not seem as greasy as the stovetop version. However, if I were only making 1 or 2 quesadillas, I would probably still go with the stovetop method rather than going to the trouble of turning on the oven.


Ironically, on my way to the party, I had to stop in at a fifth grocery store, and what do you think I saw staring me in the face from the produce section? Yes, yuca. Unbelievable.